Guide to Adding Subtitles in VLC
One of the most beloved open-source pieces of software you will find is VLC media player. This software can handle virtually any video file you throw at it, and the list of features is enormous. It’s no surprise that VLC is also capable of adding subtitles to your videos and saving them.
The process is a bit tricky to figure out, though. So let’s start at the beginning and take a step-by-step approach. Before we start with the guide, you will want to head over to VideoLan.Org and download the latest version of VLC.
There are really just two steps: Generate an SRT file then add this file to your video in VLC.
Get the SRT File
The most common way to include subtitles in your videos is by using a Subrip Subtitle (SRT) file. These files include the text for your subtitles and information on where in the video they should be placed. The easiest way to generate this file is with a third-party transcription service, such as Transcribe by Wreely. This is the software we will be using in this guide all along the way.
The Transcribe software provides both manual and automatic transcription options. As with any automatic transcription service, there is bound to be an occasional mistake when the audio is unclear, but Transcribe has a 90%+ accuracy rate. There is also a manual transcription option, but we’re going to skip that one in favor of automatically generating our subtitles.
Step 1
The first step to getting started with your transcription–after signing up for a Transribe account– is to click on the button that says ‘Start Transcribing Now’ from the homepage.

Step 2
Next, you will be given the option to choose between manual and automatic transcription. On this screen, select the button for automatic transcription.

Step 3
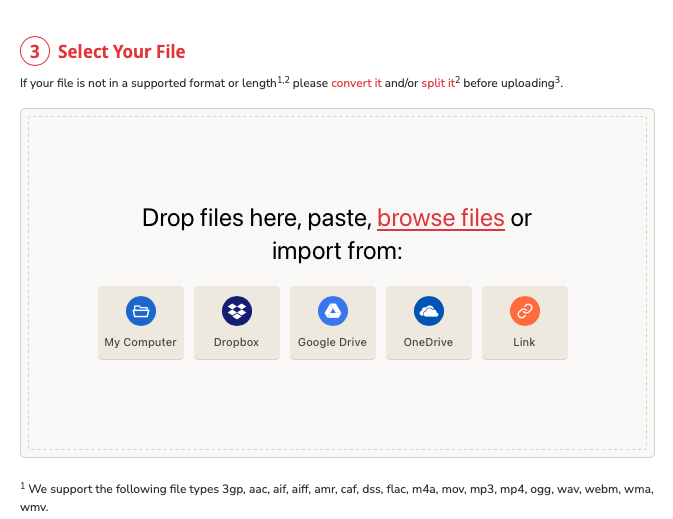
Now that you’ve chosen to begin a new automatic transcription, you will choose your transcription language and the options you want included. These options include timecodes, speaker tags, custom dictionaries, and subtitle formatting. You can choose whichever options you prefer, but including timecodes is highly recommended. Also, for the final option, check the box for subtitle formatting and select SRT for the format.
The last thing you will need to do on this screen is to upload your video file. This can come from your hard drive, or you can pull it in from a number of different cloud services such as Google Drive and One Drive.
Step 4
Depending on the length of your video, the upload process could take some time. As soon as the upload is complete, your automatic transcription will begin. Most transcriptions are complete in under an hour, and obviously the shorter the video the faster it will be. If you look in your dashboard, your list of transcription jobs shown. The new one will say “Processing” until transcription is complete.
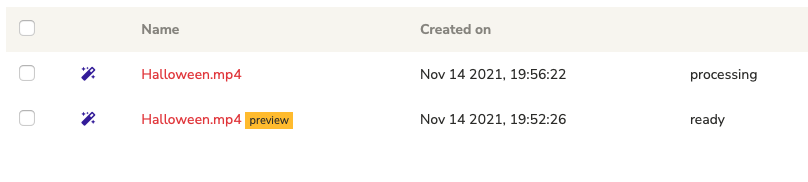
When transcription is complete, you will receive an email notification and the status will update to ‘Ready.’
Step 5
Now that your transcription is complete, simply click on the project to view the results of the automatic transcription. If you’re satisfied with the results, simply click the button for ‘Export Transcript’ on the right side of the screen. This will download your SRT file.

If there are some errors in the transcript, which can occur due to poor audio quality, you can instead click ‘Edit Transcript.’ This will allow you to edit any errors you spot in the integrated text editor.
Once you have fixed any errors, you can download the SRT file using the button in the text editor tool bar, as shown below.

Add Subtitles in VLC
Now that you have your subtitles contained in an SRT file, it’s time to get into VLC to create the subtitled version of your video.
Step 1
Launch VLC, and click on ‘Media’ in the top menu, then select ‘Convert/Save.’

Step 2
You should now see a window where you are meant to select your files. First, select your video using the ‘Add’ button near the top-right of this window. Once the video is selected, check the box next to “Use a subtitle file” then click the ‘Browse’ button to select the SRT file that you previously generated.

Click the ‘Convert/Save’ button at the bottom to continue to the next step.
Step 3
This step is absolutely critical to ensure that your subtitle file is actually used. You should see in the current window a dropdown to select a profile, and directly to the right of this a wrench icon. Click the wrench to open the profile preferences.

After clicking the wrench you will see a window with four tabs across the top: Encapsulation, Video Codec, Audio Codec, and Subtitles. The correct options should should already be selected for every tab except for subtitles.
Click over to the subtitles tab and you will likely see the the boxes are not checked next to ‘Subtitles and ‘Overlay subtitles on the video.’ At this point, go ahead and check both those boxes, and for the Codec choose DVB subtitle.

Click ‘Save’ and you will be brought back to the previous window.
Step 4
The last step to generate your subtitled video with VLC is to set the name and destination of the output file. At the bottom of the screen you are currently on, click Browse. Then choose the location where the file should be saved, and give the video a name. Finally, click “Start.”

At this point it may seem like nothing has happened. The window will close and you will be brought back to the VLC main screen. However, if you look in the destination folder you selected in this step, you should see your video. Open it up, and you will see the subtitles are included!
Final Thoughts
Adding subtitles to your videos is crucial if you plan on uploading them online for the world to see. There are many reasons why a user may choose to watch a video with subtitles, such as being in a public place or inability to hear due to background noise. By adding subtitles, you are capturing far more viewers than you would otherwise.
There are many ways to add subtitles to any video, and pretty much all of them can be accomplished with the use of an SRT file. The best way to get this file is from a transcription software such as Transcribe. Once you have this file in hand, the decision on how to go about incorporating it into your video is up to you. As we learned in this guide, VLC is one popular option.
About this Guide
This is an attempt to build the definitive guide on various topics related to dictation, transcription & recording.
Start Transcribing Now Guide Home